

How It Works
Each webhook delivery goes through the same steps:- The external service sends a JSON payload to the source’s webhook URL and signs it with the shared secret.
- The automation service checks the signature. Unsigned or wrongly signed requests are rejected.
- The event key expression reads an event name, such as
build.failed, from the payload. - Every enabled automation with an event trigger for this source is checked against that event name and its optional filter.
- Each matching automation starts a run. The full payload is added to the agent’s prompt, so the agent can act on its contents.
Before You Start
- The webhook URL must be publicly reachable. External services deliver events over the internet. A backend on
localhostor a private network can’t receive them until you expose it. See Make a Local Backend Reachable. - Your backend must support the Events page. Events appears under Automate only when the backend’s automation service declares it. If the automation service doesn’t support custom webhooks, the page shows
Custom webhooks are not supported by this automation backend. - You need permission to manage automations to add a source. Anyone who can view automations can see the list of sources and copy their URLs. Only users who can manage automations see Add event source.
GitHub, Jira Data Center, and Bitbucket Data Center are built-in sources on OpenHands Enterprise and don’t need to be registered here. See GitHub Event Automations. The IDs
github, jira_dc, and bitbucket_data_center are reserved for those integrations.Key Terms
Register an Event Source
1
Open the Events page
In Agent Canvas, open Automate and select Events in the left navigation.
2
Open the form
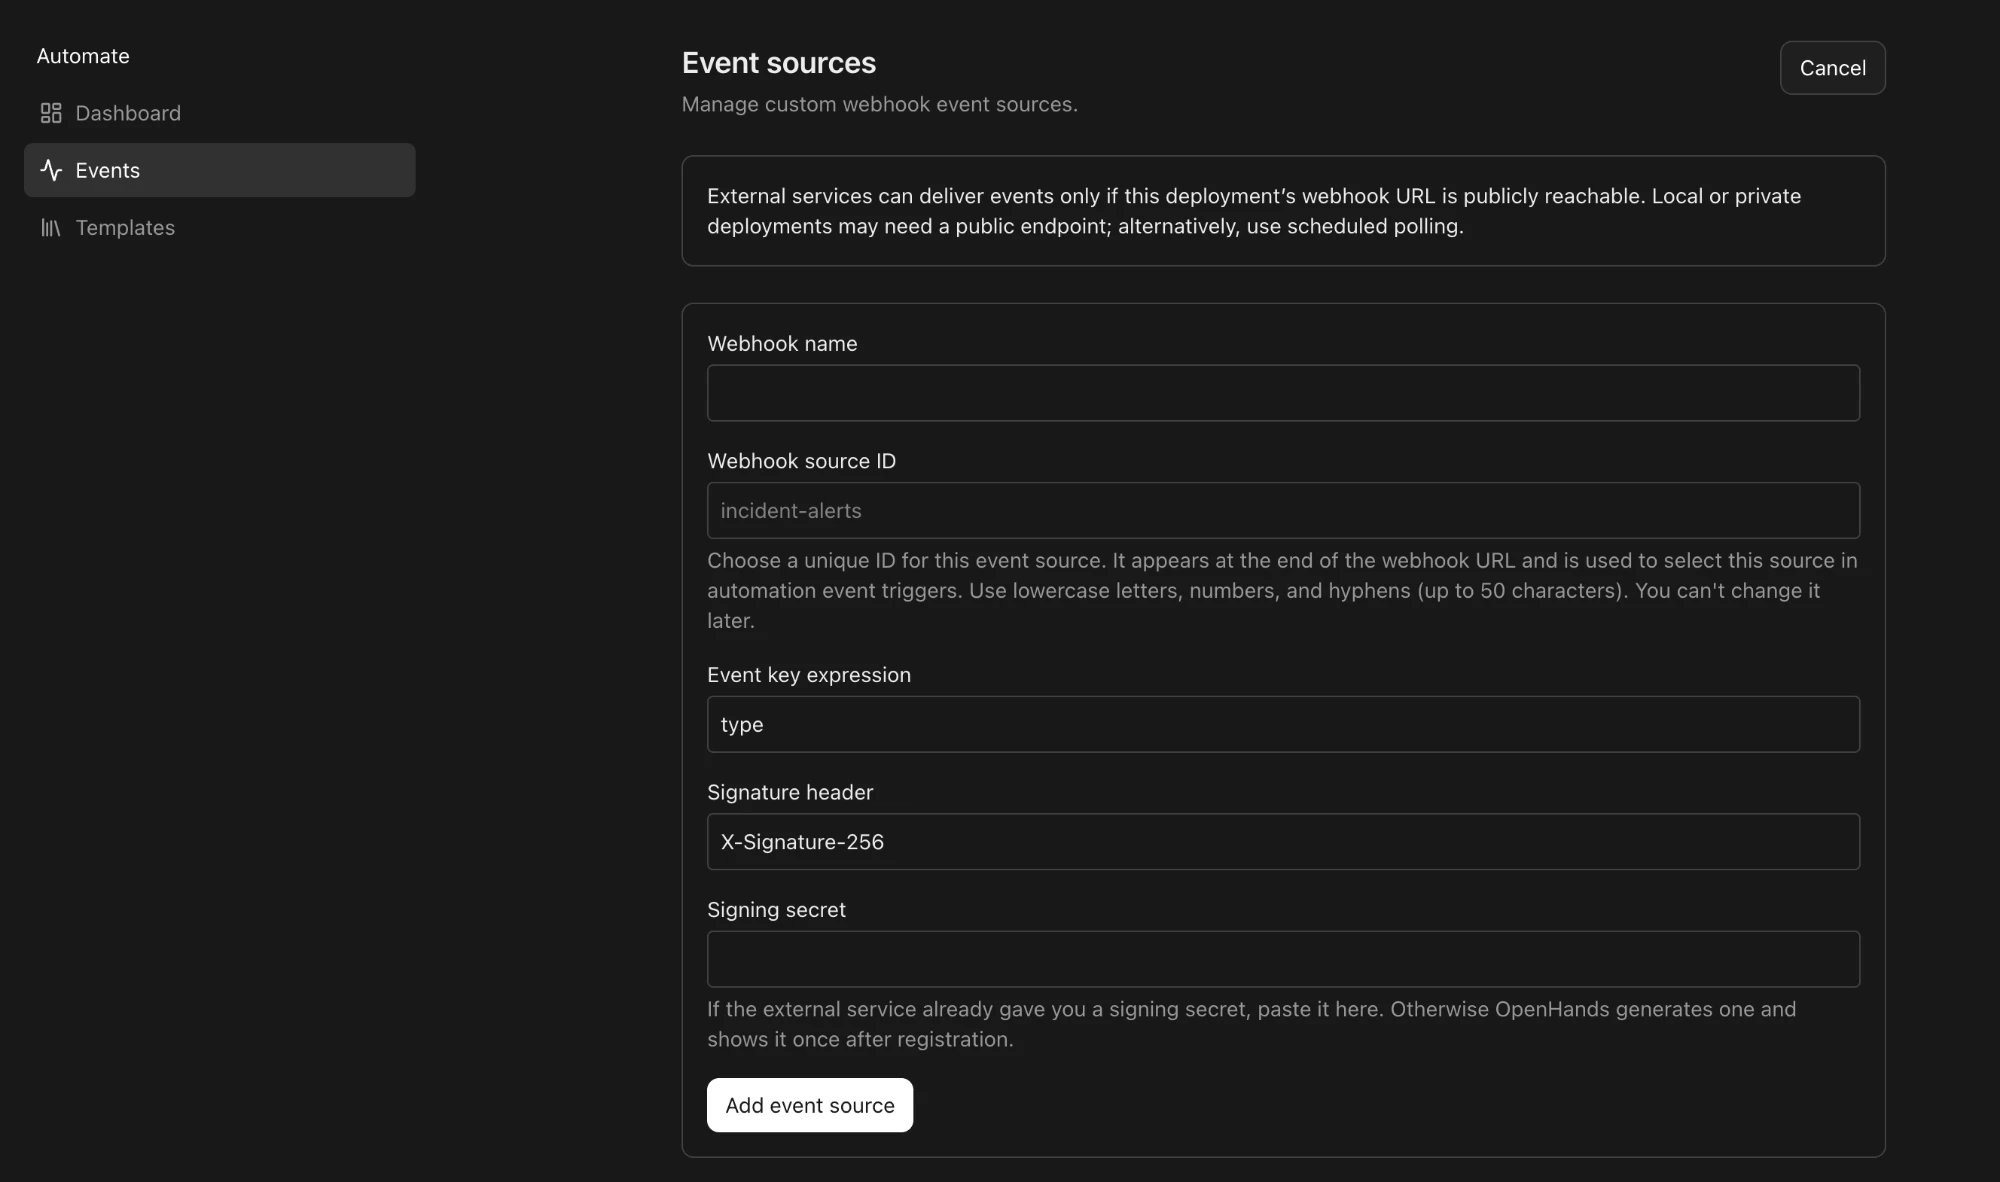
Click Add event source. The button changes to Cancel, which closes the form without saving.
3
Fill in the fields
Enter a name and a source ID. Keep the defaults for the other fields unless the external service’s documentation says otherwise. See Form Fields for details.
4
Add the source
Click Add event source at the bottom of the form. The new source appears at the top of the list with its webhook URL.
5
Save the signing secret
If you left Signing secret blank, OpenHands generates a secret and shows it in a Your generated signing secret panel. Click Copy to clipboard and store the secret somewhere safe, then click Done.
Event source created. Your supplied secret was not displayed or stored in this page. The secret is saved on the automation service, not in your browser.
Form Fields
Connect the External Service
In the external service’s webhook settings:- Set the URL to the source’s webhook URL. Click Copy webhook URL on the source in the list.
- On a local backend, the URL starts with
http://localhost. Keep the path and replace the start with your public address. See Make a Local Backend Reachable.
- On a local backend, the URL starts with
- Set the content type to JSON. The request body must be a JSON object.
- Enter the signing secret.
- Select the events you want the service to send.
Signature Requirements
OpenHands checks each request with an HMAC-SHA256 signature of the raw request body, written as lowercase hex. The header value can be the bare hex digest or the same digest with asha256= prefix:
401. This includes:
- Stripe — signs a timestamp with the body and sends
t=…,v1=…. - Slack — signs
v0:<timestamp>:<body>and sendsv0=…. - Twilio — signs the request URL and parameters with HMAC-SHA1.
- Standard Webhooks — signs the message ID, timestamp, and body, and sends base64.
Trigger an Automation from the Source
A registered source does nothing on its own. Create an automation with an event trigger that listens to it:- Open the automation setup assistant.
- Choose the event trigger and set Event source to your source ID, such as
incident-alerts. - Set Event key to the event names that should start a run.
- Optionally, add an Event filter to narrow the events further.
incident-alerts sends an incident.triggered event with high urgency, summarize the incident and suggest a first response.” The assistant fills in the trigger for you.
Event Key Patterns
The event key in the trigger is compared to the event key read from each payload:
An automation can list more than one pattern. It runs if any pattern matches.
Event Filters
A filter is a JMESPath expression checked against the payload. The automation runs only when it returns a true value. For example:What the Agent Receives
When an event starts a run, the payload is added to the start of the agent’s prompt under an Event Payload heading, followed by your prompt under Task. Write the prompt with that in mind, for example: “Read the failing build in the event payload and open an issue with the error output.” Script automations receive the same data as JSON in theAUTOMATION_EVENT_PAYLOAD environment variable, under the event key.
Choose an Event Key Expression
The event key expression tells OpenHands where to find the event name in each payload. The default,type, works for services that send a top-level type field. Look at a sample payload from the service and point the expression at the field that names the event.
The expression must return a string. Numbers and booleans are converted to strings. If the expression returns nothing for a payload, that delivery is rejected with
400, and the error lists the payload’s top-level keys to help you fix the expression.
Send a Test Event
You can check a source before connecting the real service by sending a signed request yourself. Replace the URL and secret with your own:matched is the number of automations whose trigger matched the event. A response with "matched": 0 means the source works, but no enabled automation listens for that event key. Each run in runs_created appears in the automation’s run history.
A test event is a real event. If it matches an automation, that automation runs.
Make a Local Backend Reachable
On a local or private backend, the webhook URL starts with that backend’s own address, such ashttp://localhost:8000. External services can’t reach it. To receive events:
- Expose the Canvas ingress (port
8000by default) with a public URL, such as an ngrok tunnel. See VM / Self-Hosted Installation. - In the external service, use the public address with the same path. For example,
http://localhost:8000/api/automation/v1/events/<org-id>/incident-alertsbecomeshttps://your-domain.ngrok-free.app/api/automation/v1/events/<org-id>/incident-alerts.
Manage Existing Sources
The Events page lists sources newest first, 50 at a time. Click Load more event sources to see more. Each source shows its name, source ID, status (Active or Inactive), and webhook URL. The page doesn’t edit, disable, or delete sources yet. Use the automation API for these tasks. You’ll need the source’sid, which you get from the list endpoint.
- Local Agent Canvas
- OpenHands Enterprise
Use your Canvas ingress URL and the backend API key from Manage Backends:
- The source ID can’t be changed. To use a new ID, add a new source and update the automations that use it.
- After rotating the secret, update it in the external service right away. Deliveries signed with the old secret fail.
- Deleting or disabling a source doesn’t change automations that listen to it, but they stop receiving events.
Troubleshooting
Messages on the Events Page
Delivery Responses
The external service sees these responses. Most services show them in their webhook delivery log.
If the service shows a timeout or connection error instead, it can’t reach the webhook URL. See Make a Local Backend Reachable.
Related Guides
- Managing Automations
- Event-Based Automations — register sources with the API and a Linear walkthrough
- GitHub Event Automations