> ## Documentation Index
> Fetch the complete documentation index at: https://docs.openhands.dev/llms.txt
> Use this file to discover all available pages before exploring further.
# Installation
> Install the OpenHands CLI on your system
**Windows users:** All commands below should be run inside the WSL terminal (Ubuntu). Use `wsl -d Ubuntu` in PowerShell or search "Ubuntu" in the Start menu to access the Ubuntu terminal. We also have a [step-by-step video tutorial](https://youtu.be/Kp40Qqz4ZPw) available.
## Installation Methods
Requires Python 3.12+ and [uv](https://docs.astral.sh/uv/) installed.
**Install OpenHands:**
```bash theme={null}
uv tool install openhands --python 3.12
```
**Run OpenHands:**
```bash theme={null}
openhands
```
**Upgrade OpenHands:**
```bash theme={null}
uv tool upgrade openhands --python 3.12
```
Install the OpenHands CLI binary with the install script:
```bash theme={null}
curl -fsSL https://install.openhands.dev/install.sh | sh
```
Then run:
```bash theme={null}
openhands
```
Your system may require you to allow permissions to run the executable.
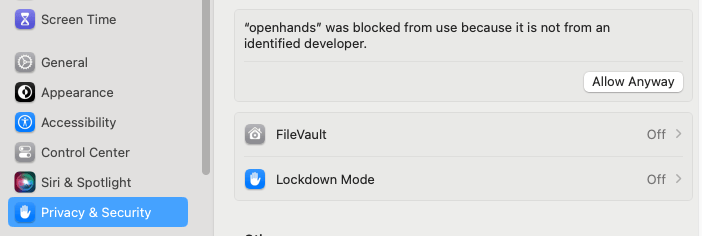
When running the OpenHands CLI on Mac, you may get a warning that says "openhands can't be opened because Apple
cannot check it for malicious software."
1. Open `System Settings`.
2. Go to `Privacy & Security`.
3. Scroll down to `Security` and click `Allow Anyway`.
4. Rerun the OpenHands CLI.
 1. Set the following environment variable in your terminal:
* `SANDBOX_VOLUMES` to specify the directory you want OpenHands to access ([See using SANDBOX\_VOLUMES for more info](/openhands/usage/sandboxes/docker#using-sandbox_volumes))
2. Ensure you have configured your settings before starting:
* Set up `~/.openhands/settings.json` with your LLM configuration
3. Run the following command:
```bash theme={null}
docker run -it \
--pull=always \
-e AGENT_SERVER_IMAGE_REPOSITORY=ghcr.io/openhands/agent-server \
-e AGENT_SERVER_IMAGE_TAG=1.19.1-python \
-e SANDBOX_USER_ID=$(id -u) \
-e SANDBOX_VOLUMES=$SANDBOX_VOLUMES \
-v /var/run/docker.sock:/var/run/docker.sock \
-v ~/.openhands:/root/.openhands \
--add-host host.docker.internal:host-gateway \
--name openhands-cli-$(date +%Y%m%d%H%M%S) \
python:3.12-slim \
bash -c "pip install uv && uv tool install openhands --python 3.12 && openhands"
```
The `-e SANDBOX_USER_ID=$(id -u)` is passed to the Docker command to ensure the sandbox user matches the host user's
permissions. This prevents the agent from creating root-owned files in the mounted workspace.
## First Run
The first time you run the CLI, it will take you through configuring the required LLM settings. These will be saved
for future sessions in `~/.openhands/settings.json`.
The conversation history will be saved in `~/.openhands/conversations`.
If you're upgrading from a CLI version before release 1.0.0, you'll need to redo your settings setup as the
configuration format has changed.
## Next Steps
* [Quick Start](/openhands/usage/cli/quick-start) - Learn the basics of using the CLI
* [MCP Servers](/openhands/usage/cli/mcp-servers) - Configure MCP servers
1. Set the following environment variable in your terminal:
* `SANDBOX_VOLUMES` to specify the directory you want OpenHands to access ([See using SANDBOX\_VOLUMES for more info](/openhands/usage/sandboxes/docker#using-sandbox_volumes))
2. Ensure you have configured your settings before starting:
* Set up `~/.openhands/settings.json` with your LLM configuration
3. Run the following command:
```bash theme={null}
docker run -it \
--pull=always \
-e AGENT_SERVER_IMAGE_REPOSITORY=ghcr.io/openhands/agent-server \
-e AGENT_SERVER_IMAGE_TAG=1.19.1-python \
-e SANDBOX_USER_ID=$(id -u) \
-e SANDBOX_VOLUMES=$SANDBOX_VOLUMES \
-v /var/run/docker.sock:/var/run/docker.sock \
-v ~/.openhands:/root/.openhands \
--add-host host.docker.internal:host-gateway \
--name openhands-cli-$(date +%Y%m%d%H%M%S) \
python:3.12-slim \
bash -c "pip install uv && uv tool install openhands --python 3.12 && openhands"
```
The `-e SANDBOX_USER_ID=$(id -u)` is passed to the Docker command to ensure the sandbox user matches the host user's
permissions. This prevents the agent from creating root-owned files in the mounted workspace.
## First Run
The first time you run the CLI, it will take you through configuring the required LLM settings. These will be saved
for future sessions in `~/.openhands/settings.json`.
The conversation history will be saved in `~/.openhands/conversations`.
If you're upgrading from a CLI version before release 1.0.0, you'll need to redo your settings setup as the
configuration format has changed.
## Next Steps
* [Quick Start](/openhands/usage/cli/quick-start) - Learn the basics of using the CLI
* [MCP Servers](/openhands/usage/cli/mcp-servers) - Configure MCP servers