> ## Documentation Index
> Fetch the complete documentation index at: https://docs.openhands.dev/llms.txt
> Use this file to discover all available pages before exploring further.
# Quick Start
> Get started with a 30-day trial of OpenHands Enterprise.
This guide walks you through trialing OpenHands Enterprise on your own infrastructure.
You'll provision infrastructure (AWS Terraform or a manual VM setup), configure
GitHub for user authentication, and configure your LLM provider.
## Who This Is For
This guide is **not** for single-user local laptop installs. It is for a **30-day trial of OpenHands Enterprise** on a
**dedicated VM/server** on your own infrastructure. The deployment requires DNS records, network, and compute setup before installation.
If you want to use OpenHands immediately without infrastructure setup:
* Use OpenHands Cloud (SaaS)
* Run OpenHands open-source locally using Docker, CLI or SDK
### Accounts and Credentials
Before you begin, make sure you have the following ready:
Sign up for a free 30-day OpenHands Enterprise trial account. You'll need this to access the installer dashboard.
* **LLM credentials** from your chosen provider, for example an Anthropic API
key from the [Anthropic Console](https://console.anthropic.com/)
* **A GitHub account** with permission to create GitHub Apps
* **An AWS account** with permissions to create EC2, VPC, and Route53 resources (**if using the AWS with Terraform path**)
## Provision Infrastructure
You will need a VM to host OpenHands Enterprise. Choose one of the options below to provision your infrastructure.
We provide a [Terraform module](https://github.com/All-Hands-AI/OpenHands-Cloud/tree/main/terraform/aws) that provisions a properly configured environment
for OpenHands Enterprise, including the EC2 instance, DNS records, and TLS certificates.
Follow the README instructions to configure and apply the Terraform configuration.
If you are provisioning a VM manually (on-premises or on another cloud provider),
it must meet the requirements below.
| Resource | Requirement |
| -------------------------- | --------------------------- |
| **vCPUs** | 16 |
| **Memory** | 64 GB |
| **Disk** | 200 GB |
| **Disk P99 write latency** | 10 ms maximum |
| **OS** | Linux (x86-64 architecture) |
| **Init system** | systemd |
| **Access** | Root access (sudo) required |
**Firewall inbound rules** -- the following ports must be open:
| Port | Protocol | Purpose |
| ----- | -------- | --------------------- |
| 80 | TCP | HTTP ingress/redirect |
| 443 | TCP | HTTPS |
| 30000 | TCP | Admin Console |
**Local ports** -- the following ports must be available for local processes (no firewall rules needed):
`2379/TCP`, `7443/TCP`, `9099/TCP`, `10248/TCP`, `10257/TCP`, `10259/TCP`
**Outbound access** -- the VM must be able to reach:
* `replicated.app`
* `proxy.replicated.com`
* `images.r9.all-hands.dev`
* `install.r9.all-hands.dev`
* `charts.r9.all-hands.dev`
* `updates.r9.all-hands.dev`
* `github.com`
* `traefik.github.io`
* `registry-1.docker.io`
* `ghcr.io`
The installation creates directories and files in the following locations:
```
/etc/cni
/etc/k0s
/opt/cni
/opt/containerd
/run/calico
/run/containerd
/run/k0s
/sys/fs/cgroup/kubepods
/sys/fs/cgroup/system.slice/containerd.service
/sys/fs/cgroup/system.slice/k0scontroller.service
/usr/libexec/k0s
/usr/local/bin/k0s
/var/lib/calico
/var/lib/cni
/var/lib/containers
/var/lib/embedded-cluster
/var/lib/kubelet
/var/log/calico
/var/log/containers
/var/log/embedded-cluster
/var/log/pods
```
### DNS and TLS Setup
Once your VM is running, configure DNS and TLS before starting the installer.
**Create DNS A records** pointing to your VM's public IP address:
| Record | Example |
| ----------------------------- | ------------------------------------- |
| `` | `openhands.example.com` |
| `app.` | `app.openhands.example.com` |
| `analytics.app.` | `analytics.app.openhands.example.com` |
| `auth.app.` | `auth.app.openhands.example.com` |
| `llm-proxy.` | `llm-proxy.openhands.example.com` |
| `runtime-api.` | `runtime-api.openhands.example.com` |
| `*.runtime.` | `*.runtime.openhands.example.com` |
**Obtain a TLS certificate signed by a well-known certificate authority (CA) such as Let's Encrypt**, with SANs
(Subject Alternative Names) for all of the above domains, then copy the certificate
(`.pem` or `.crt`) and private key (`.pem` or `.key`) to the VM. Self-signed certificates
are not supported for the OpenHands application.
If you don't provide TLS certificates during installation, the Admin Console will use a
self-signed certificate and your browser will display a security warning. You can still
upload your certificate afterward through the Admin Console.
## Preflight Validation
All items below must be completed before running the installer:
* VM meets CPU, memory, disk, and OS requirements
* DNS records are created and resolve from the VM
* Inbound ports are open: `80`, `443`, and `30000`
* Outbound domains are reachable from the VM
* GitHub App prerequisites are prepared
* (Optional) [External PostgreSQL](/enterprise/external-postgres) instance provisioned if using your own database
Do not run the installer until preflight checks pass.
### DNS checks
Run the checks below on the target VM before opening the installer dashboard.
Export your base domain:
```bash theme={null}
export BASE_DOMAIN="openhands.example.com"
```
Test DNS:
```bash theme={null}
for h in \
"${BASE_DOMAIN}" \
"app.${BASE_DOMAIN}" \
"analytics.app.${BASE_DOMAIN}" \
"auth.app.${BASE_DOMAIN}" \
"llm-proxy.${BASE_DOMAIN}" \
"runtime-api.${BASE_DOMAIN}"; do
echo "[DNS] $h"
getent hosts "$h" || nslookup "$h"
done
```
Expected: each hostname above resolves to your VM's public IP address.
Test that a runtime wildcard hostname resolves:
```bash theme={null}
getent hosts "test.runtime.${BASE_DOMAIN}" || nslookup "test.runtime.${BASE_DOMAIN}"
```
Expected: `test.runtime.${BASE_DOMAIN}` resolves to the same target as `${BASE_DOMAIN}`.
### Outbound connectivity checks
```bash theme={null}
urls=(
"https://replicated.app"
"https://proxy.replicated.com/v2/"
"https://images.r9.all-hands.dev/v2/"
"https://install.r9.all-hands.dev"
"https://charts.r9.all-hands.dev"
"https://updates.r9.all-hands.dev"
"https://github.com"
"https://traefik.github.io/charts/index.yaml"
"https://registry-1.docker.io/v2/"
"https://ghcr.io/v2/"
)
for u in "${urls[@]}"; do
# HTTP 000 means connection failure (DNS failure, timeout, or blocked network path).
code=$(curl -sSIL --max-time 15 -o /dev/null -w "%{http_code}" "$u" || true)
if [ "$code" = "000" ]; then
echo "FAIL $u"
else
echo "OK $u (HTTP $code)"
fi
done
```
Any HTTP response code other than `000` is acceptable for reachability checks
(for example `200`, `301`, `302`, `401`, `403`, `405`).
If any check fails, stop and resolve before continuing:
* DNS failures: Verify records are created, point to the right target, and have finished propagating
* Outbound connectivity failures: Check firewall egress rules, proxy settings, and TLS inspection policies
## Reasons for Requirements
| Requirement | Why It Exists |
| ---------------------------------------------------------------- | --------------------------------------------------------------------- |
| `443/TCP` inbound | Primary HTTPS entrypoint for users and service hostnames |
| `30000/TCP` inbound | Replicated/KOTS Admin Console for install and configuration |
| `80/TCP` inbound | HTTP entrypoint used for ingress/redirect behavior |
| `*.runtime.` DNS + cert SAN | Runtime sandboxes are addressed by dynamic runtime-specific hostnames |
| `replicated.app`, `proxy.replicated.com` | Replicated control-plane/license/install paths |
| `images.r9...`, `charts.r9...`, `updates.r9...`, `install.r9...` | Vendor distribution image/chart/update/install endpoints |
| `traefik.github.io` | Embedded cluster ingress chart repository |
| `ghcr.io`, `registry-1.docker.io` | Container image pulls for platform components |
| `github.com` | GitHub App setup/auth/webhooks and downloading public agent skills |
## Run the Installer
### 1. Access the Installer Dashboard
After preflight validation checks have passed, [register for a free 30-day trial](https://install.r9.all-hands.dev/openhands/signup), then
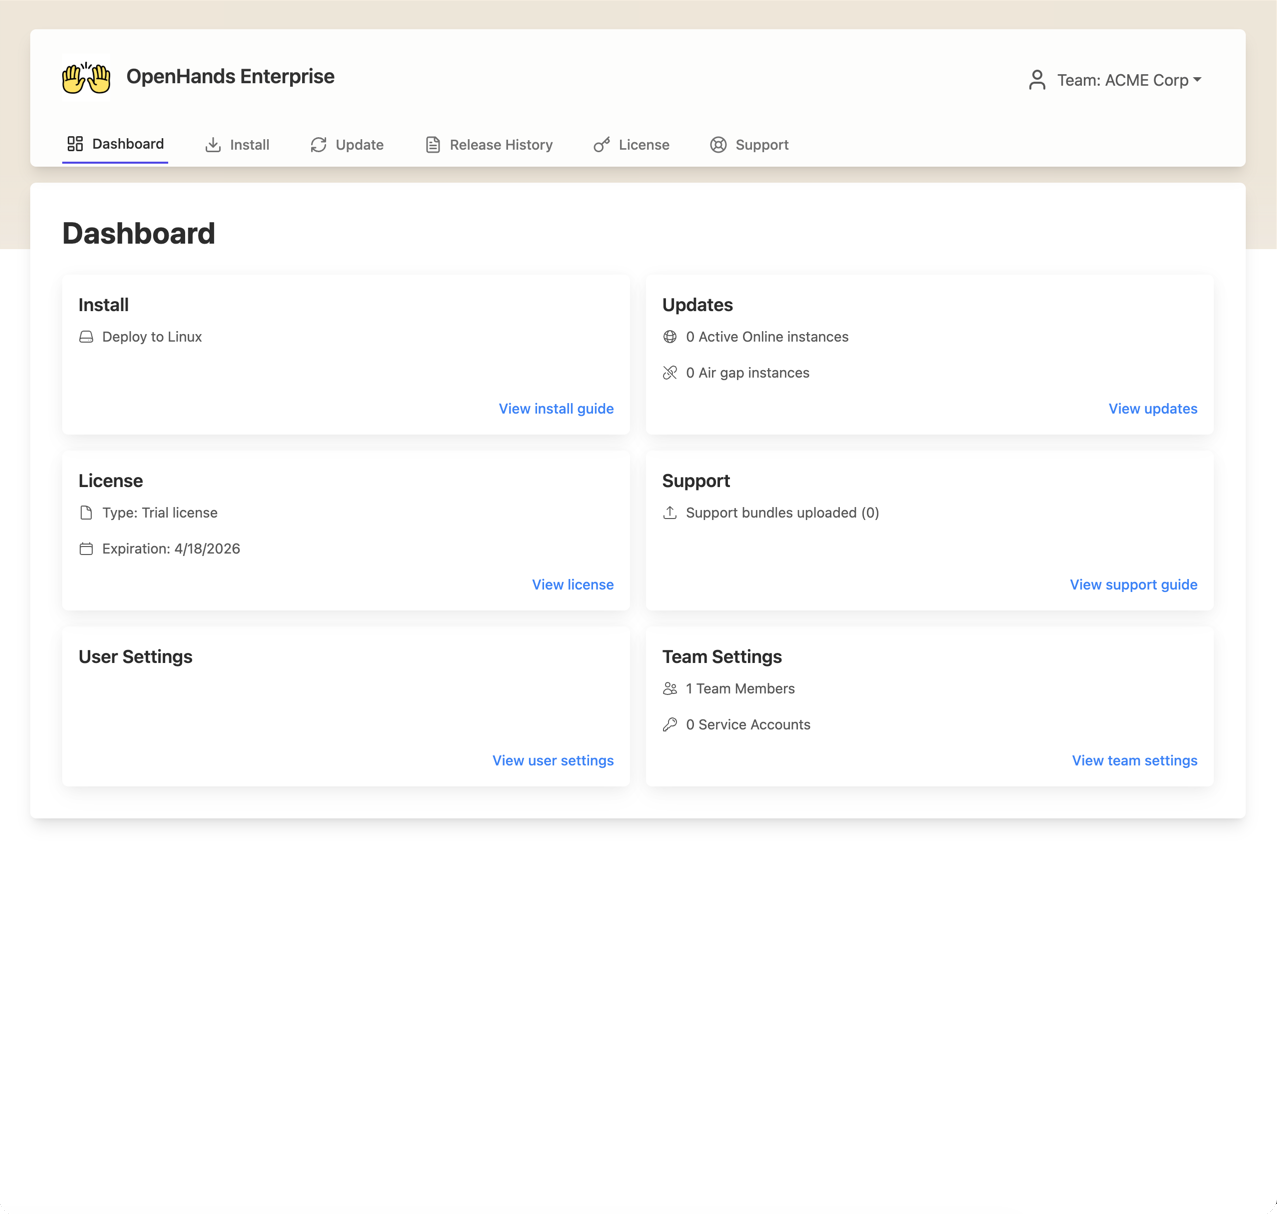
log in to the installer dashboard. You will see the dashboard below.
Click **"View install guide"** in the Install tile.
 ### 2. Name your instance
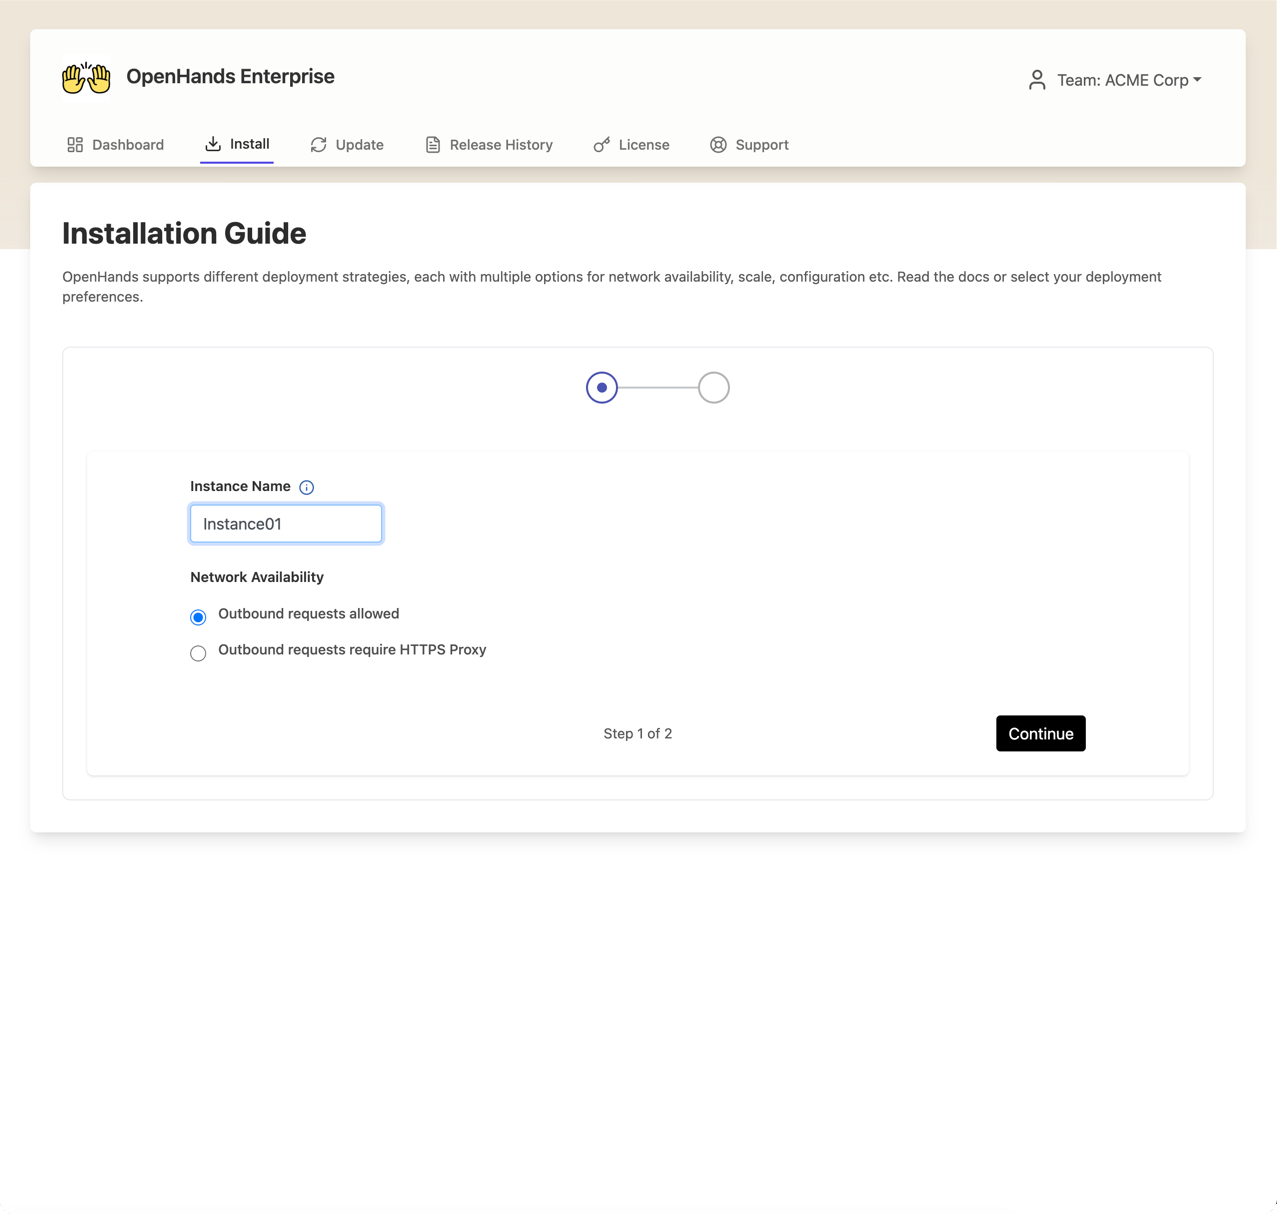
Enter a name for your instance (e.g., your company name or environment identifier).
Select **"Outbound requests allowed"** for Network Availability, then click **Continue**.
### 2. Name your instance
Enter a name for your instance (e.g., your company name or environment identifier).
Select **"Outbound requests allowed"** for Network Availability, then click **Continue**.
 ### 3. Run the installation commands
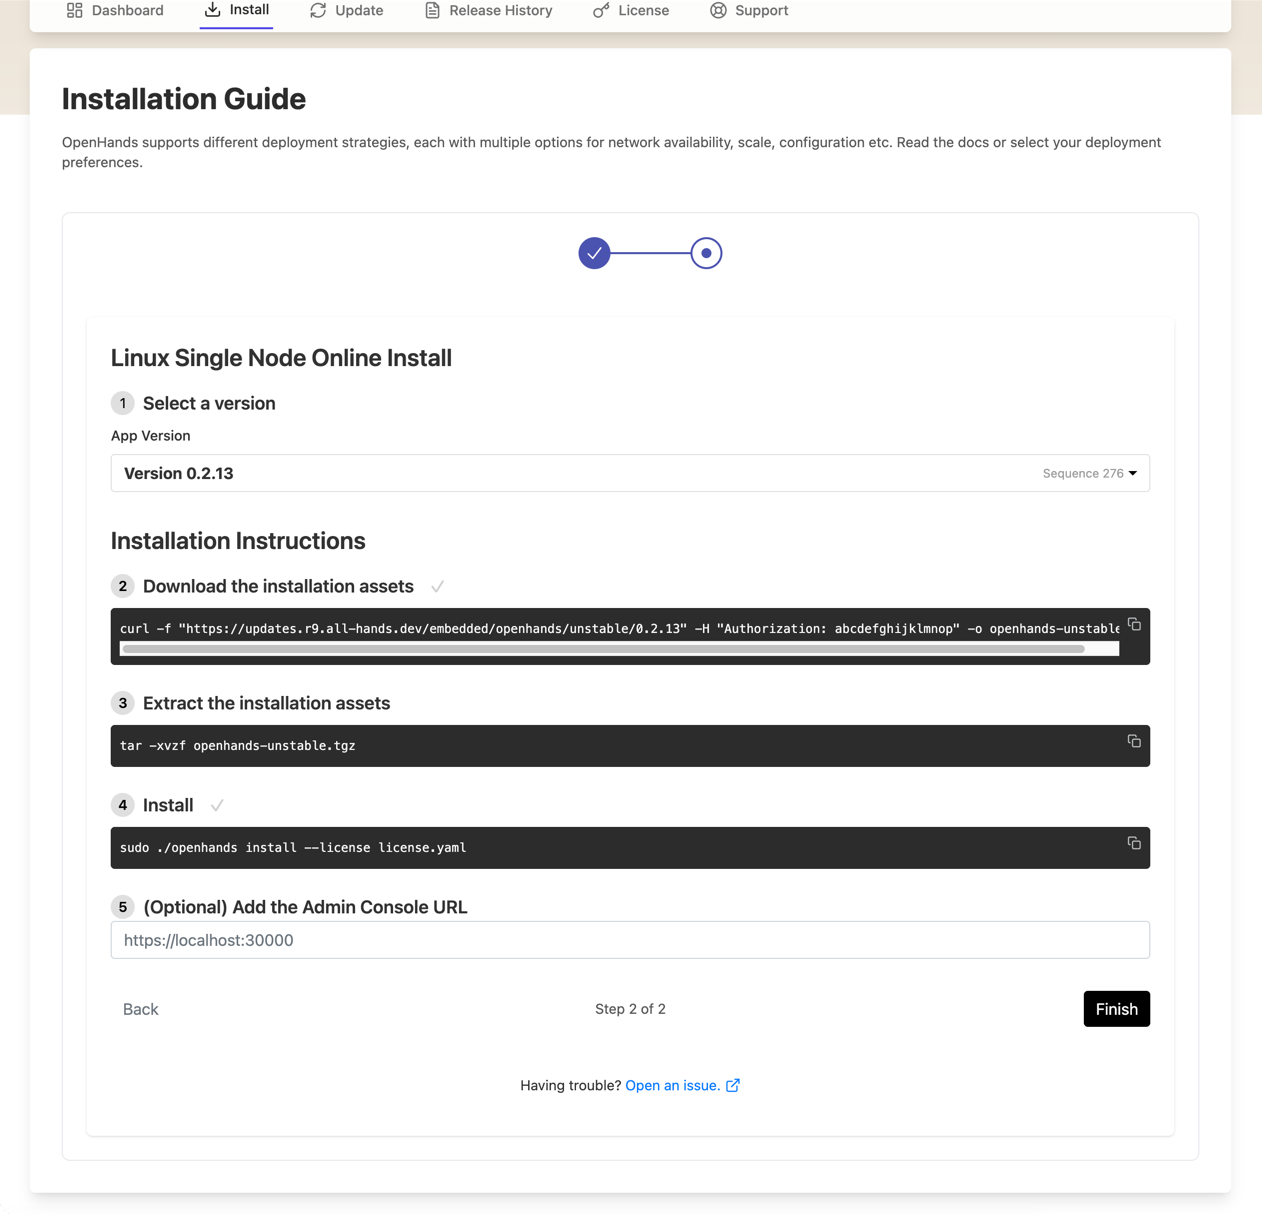
The install guide provides commands to run on your VM. SSH into your VM and execute them in order:
1. **Select a version** -- the latest version is pre-selected
2. **Download the installation assets** -- copy and run the `curl` command shown
3. **Extract the installation assets** -- run the `tar` command shown (this includes your license file)
4. **Install** -- run the install command shown
If the install command fails after preflight checks pass, run `sudo ./openhands support-bundle` and share the resulting bundle with support.
**We recommend providing your TLS certificates during installation.** If you used the
Terraform module, the certificates are in your home directory:
```bash theme={null}
sudo ./openhands install --license license.yaml \
--tls-cert ~/certificate.pem \
--tls-key ~/private-key.pem
```
If you provisioned manually and have your own certificates on the VM, pass them the same way.
You can also omit the `--tls-cert` and `--tls-key` flags and upload certificates later through
the Admin Console.
### 3. Run the installation commands
The install guide provides commands to run on your VM. SSH into your VM and execute them in order:
1. **Select a version** -- the latest version is pre-selected
2. **Download the installation assets** -- copy and run the `curl` command shown
3. **Extract the installation assets** -- run the `tar` command shown (this includes your license file)
4. **Install** -- run the install command shown
If the install command fails after preflight checks pass, run `sudo ./openhands support-bundle` and share the resulting bundle with support.
**We recommend providing your TLS certificates during installation.** If you used the
Terraform module, the certificates are in your home directory:
```bash theme={null}
sudo ./openhands install --license license.yaml \
--tls-cert ~/certificate.pem \
--tls-key ~/private-key.pem
```
If you provisioned manually and have your own certificates on the VM, pass them the same way.
You can also omit the `--tls-cert` and `--tls-key` flags and upload certificates later through
the Admin Console.
 ### 4. Access the Admin Console
Once the install command completes, the Admin Console is available at:
* `https://:30000` (if you provided TLS certificates)
* `http://:30000` (if you did not use the `--tls-cert` and `--tls-key` flags on the `install` command)
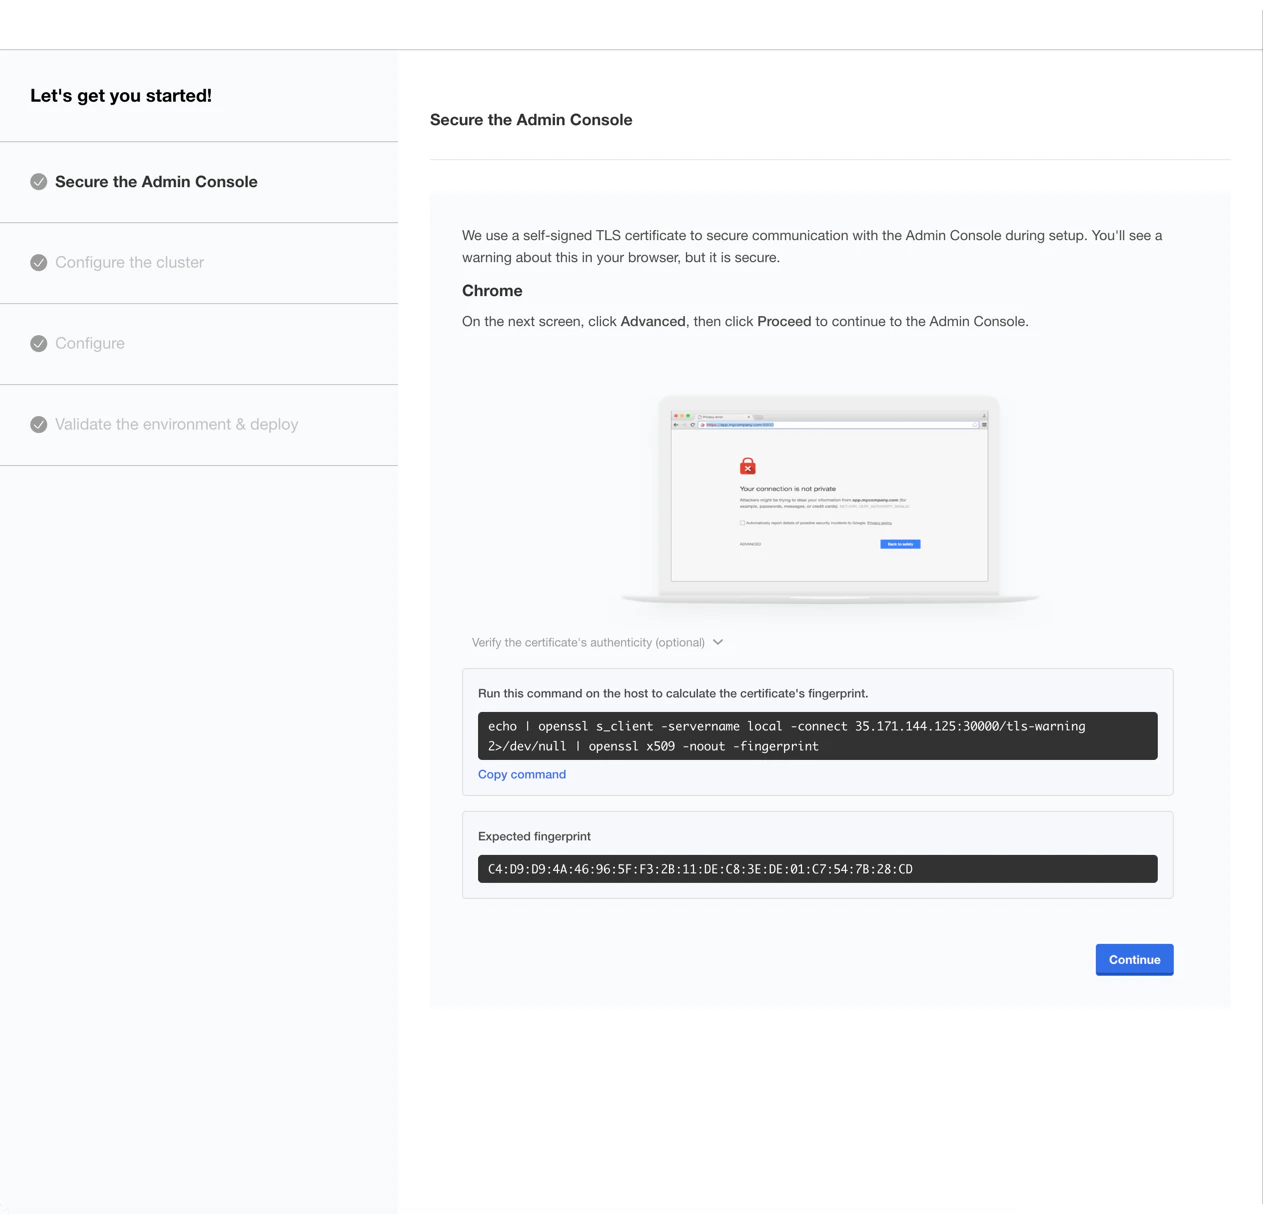
If you did not provide TLS certificates with the `install` command, your browser will display a security warning.
Click **Advanced**, then **Proceed** to continue to the Admin Console.
### 4. Access the Admin Console
Once the install command completes, the Admin Console is available at:
* `https://:30000` (if you provided TLS certificates)
* `http://:30000` (if you did not use the `--tls-cert` and `--tls-key` flags on the `install` command)
If you did not provide TLS certificates with the `install` command, your browser will display a security warning.
Click **Advanced**, then **Proceed** to continue to the Admin Console.
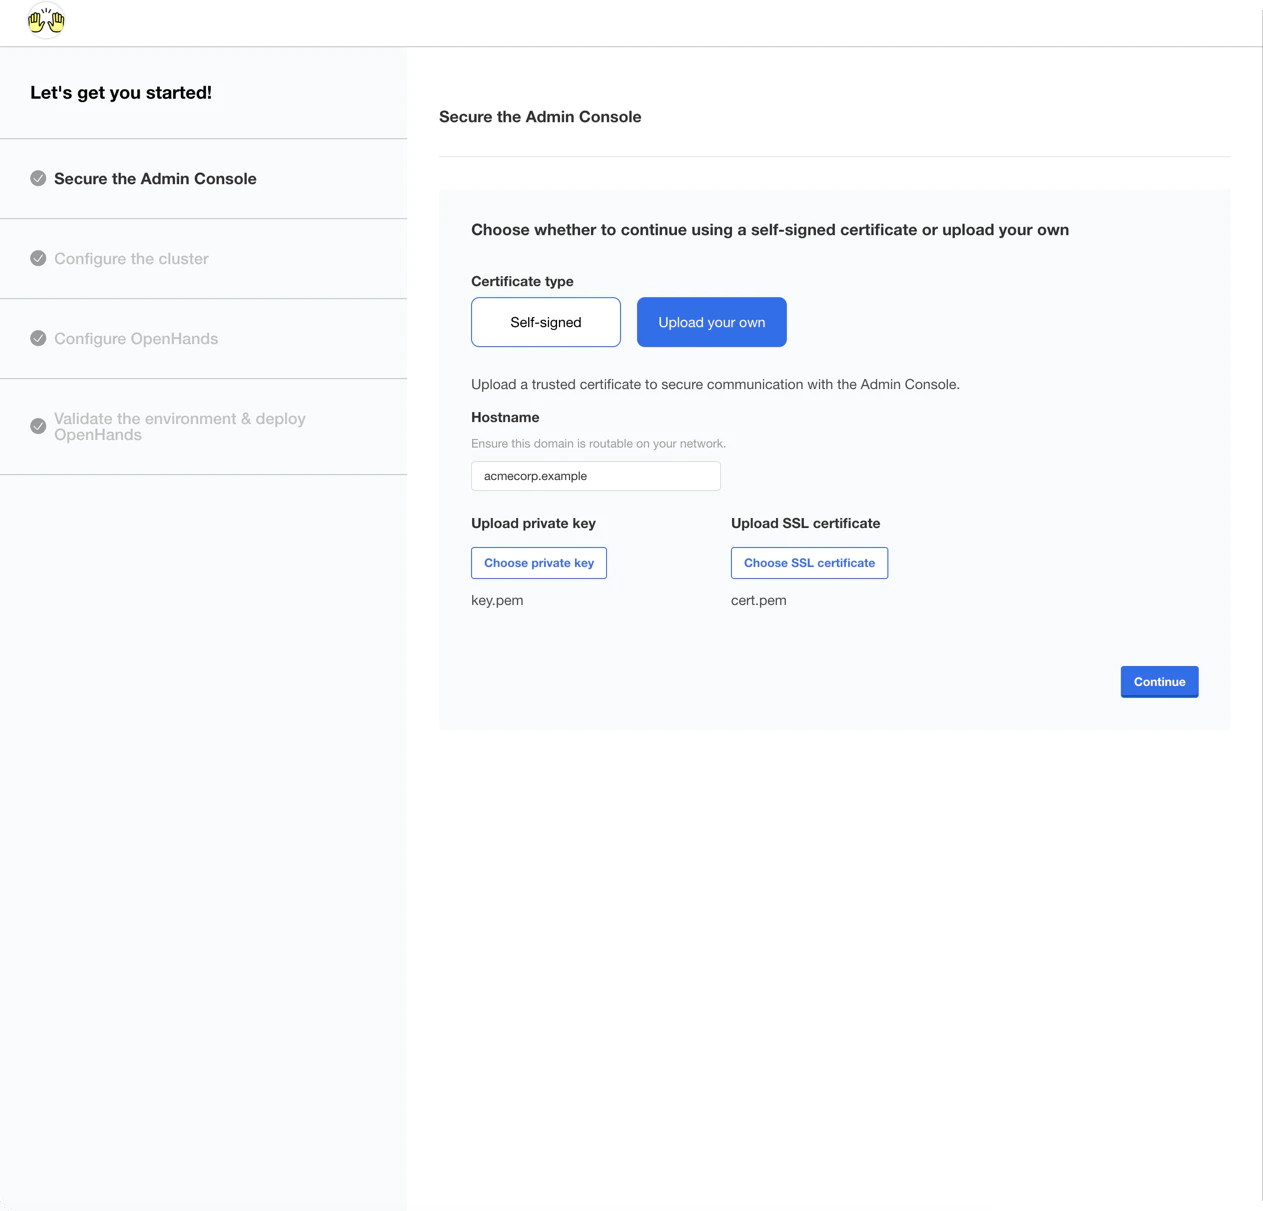
 ### 5. Upload TLS certificate (if not provided with the install command)
If you did not provide certificates with the `install` command, select **"Upload your own"**,
enter your base domain under **Hostname**, upload your private key and SSL certificate, then click **Continue**.
### 5. Upload TLS certificate (if not provided with the install command)
If you did not provide certificates with the `install` command, select **"Upload your own"**,
enter your base domain under **Hostname**, upload your private key and SSL certificate, then click **Continue**.
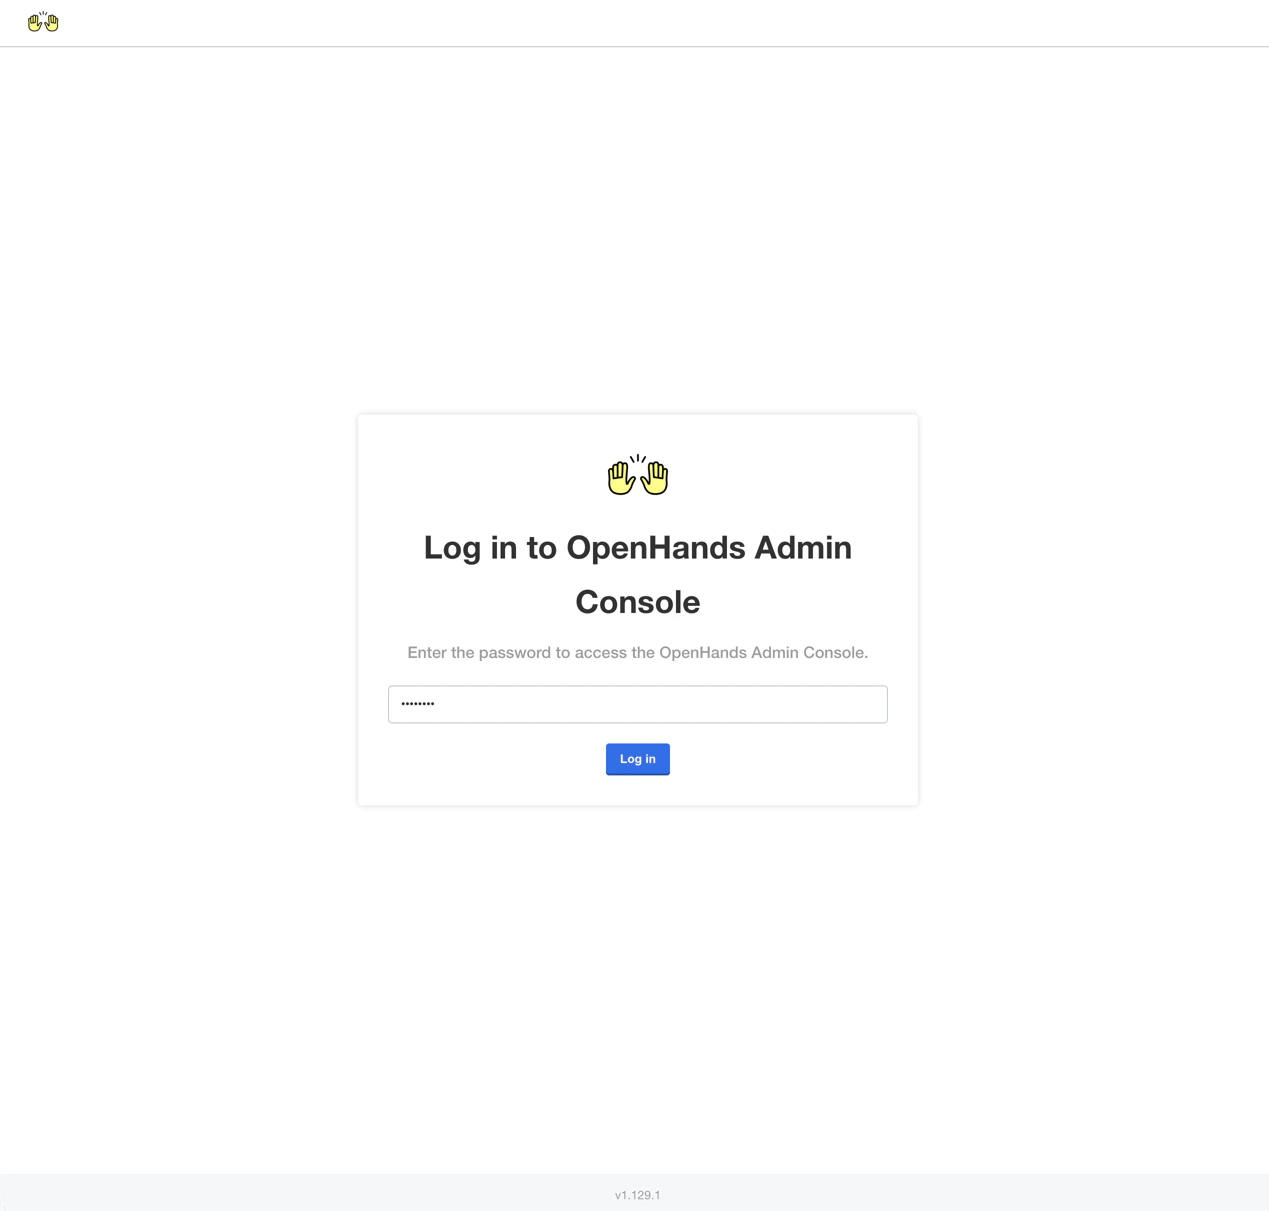
 ### 6. Log in to the Admin Console
Enter the password you set during installation and click **Log in**.
### 6. Log in to the Admin Console
Enter the password you set during installation and click **Log in**.
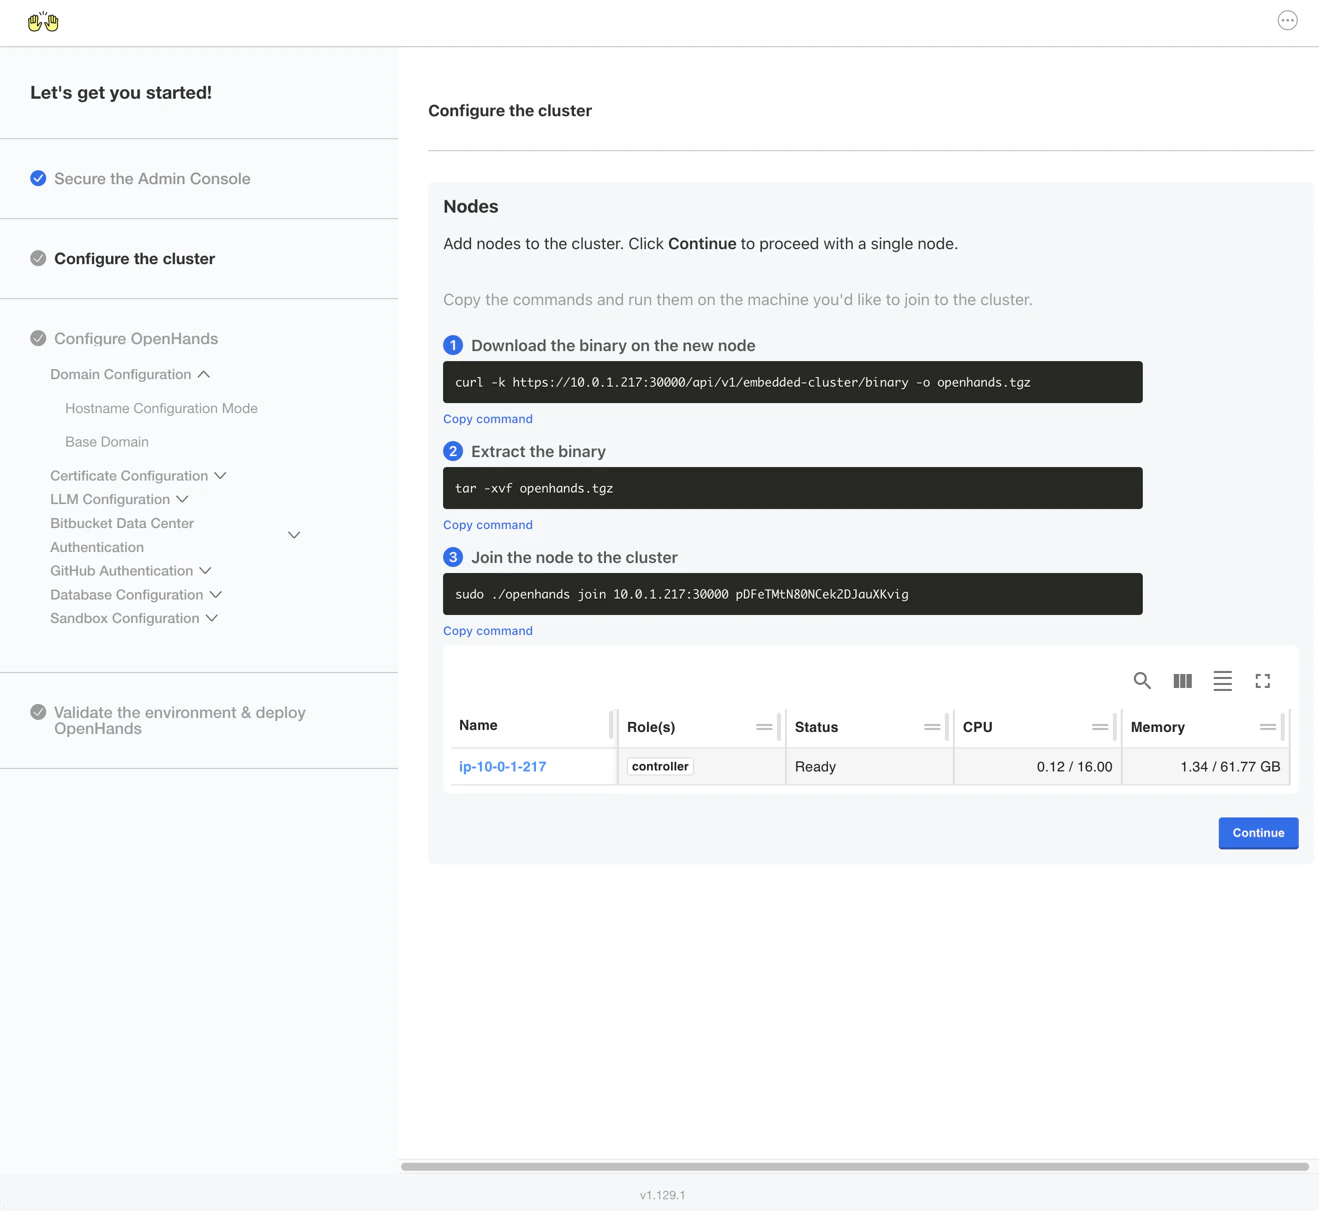
 ### 7. Configure the cluster
You will be prompted to add additional nodes to the cluster.
For a single-node deployment, click **Continue** to skip this step.
### 7. Configure the cluster
You will be prompted to add additional nodes to the cluster.
For a single-node deployment, click **Continue** to skip this step.
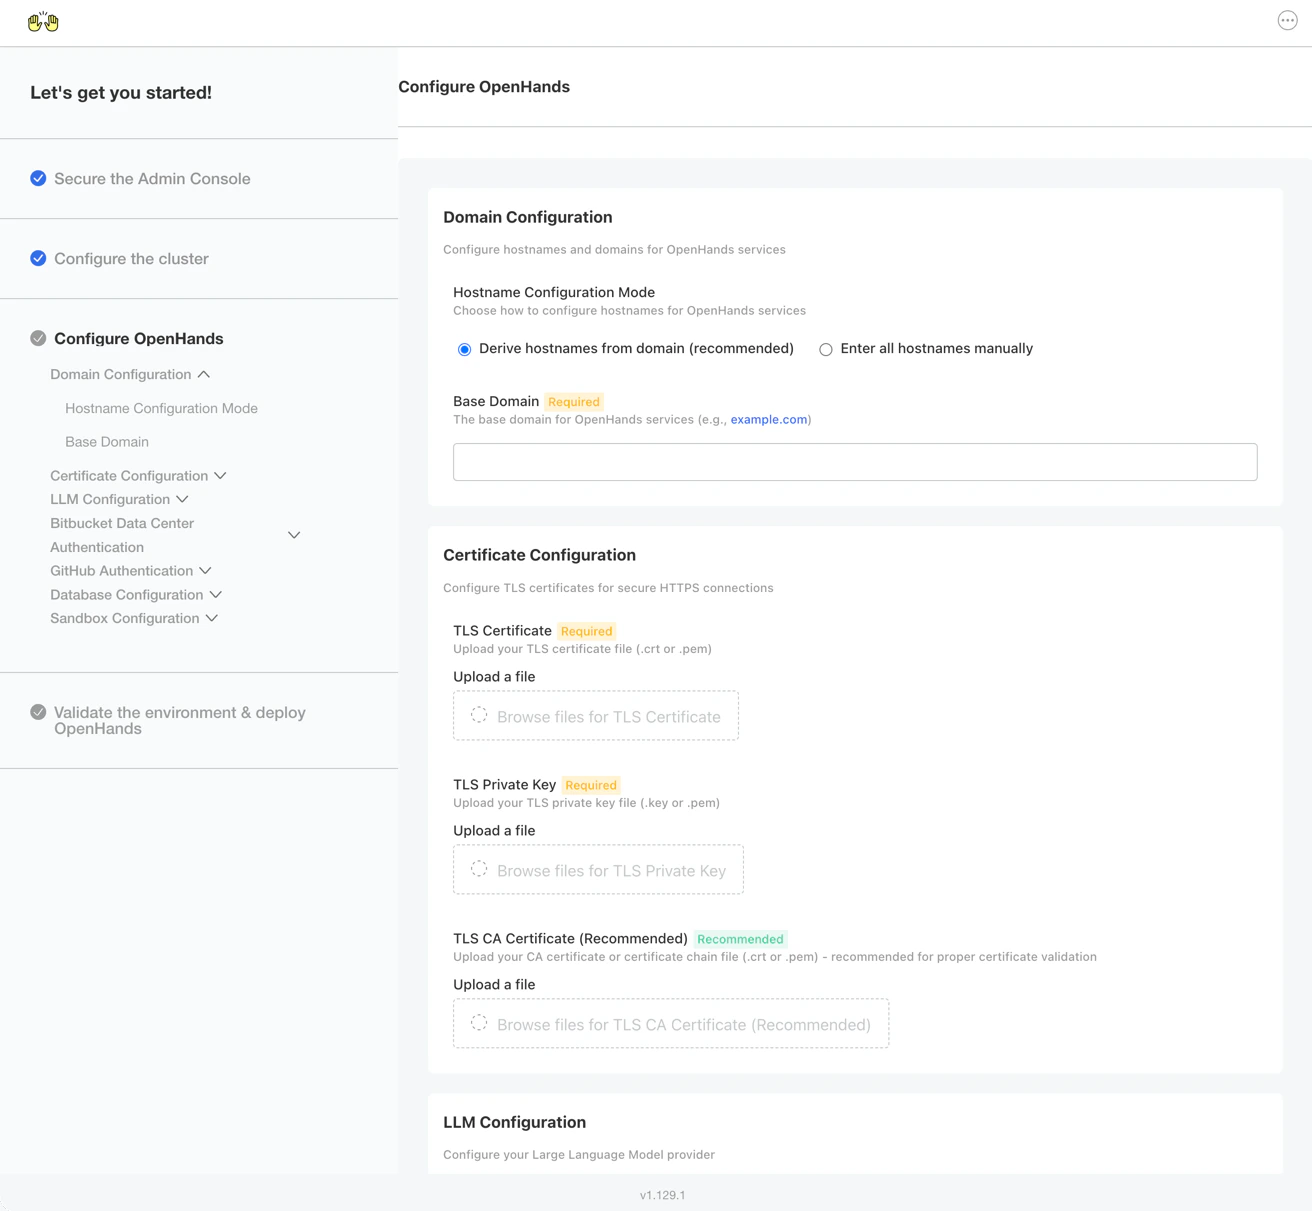
 ## Configure OpenHands
You should now see the application configuration page.
## Configure OpenHands
You should now see the application configuration page.
 ### Domain Configuration
* Select **"Derive hostnames from domain (recommended)"**
* Enter your base domain (e.g., `openhands.example.com`)
### Certificate Configuration
* Upload your **TLS Certificate** (`.crt` or `.pem`)
* Upload your **TLS Private Key** (`.key` or `.pem`)
* Optionally upload the root **CA Certificate** for your TLS certificates
### LLM Configuration
Choose an LLM provider from the LLM Configuration dropdown and enter the details
from that provider.
### Domain Configuration
* Select **"Derive hostnames from domain (recommended)"**
* Enter your base domain (e.g., `openhands.example.com`)
### Certificate Configuration
* Upload your **TLS Certificate** (`.crt` or `.pem`)
* Upload your **TLS Private Key** (`.key` or `.pem`)
* Optionally upload the root **CA Certificate** for your TLS certificates
### LLM Configuration
Choose an LLM provider from the LLM Configuration dropdown and enter the details
from that provider.
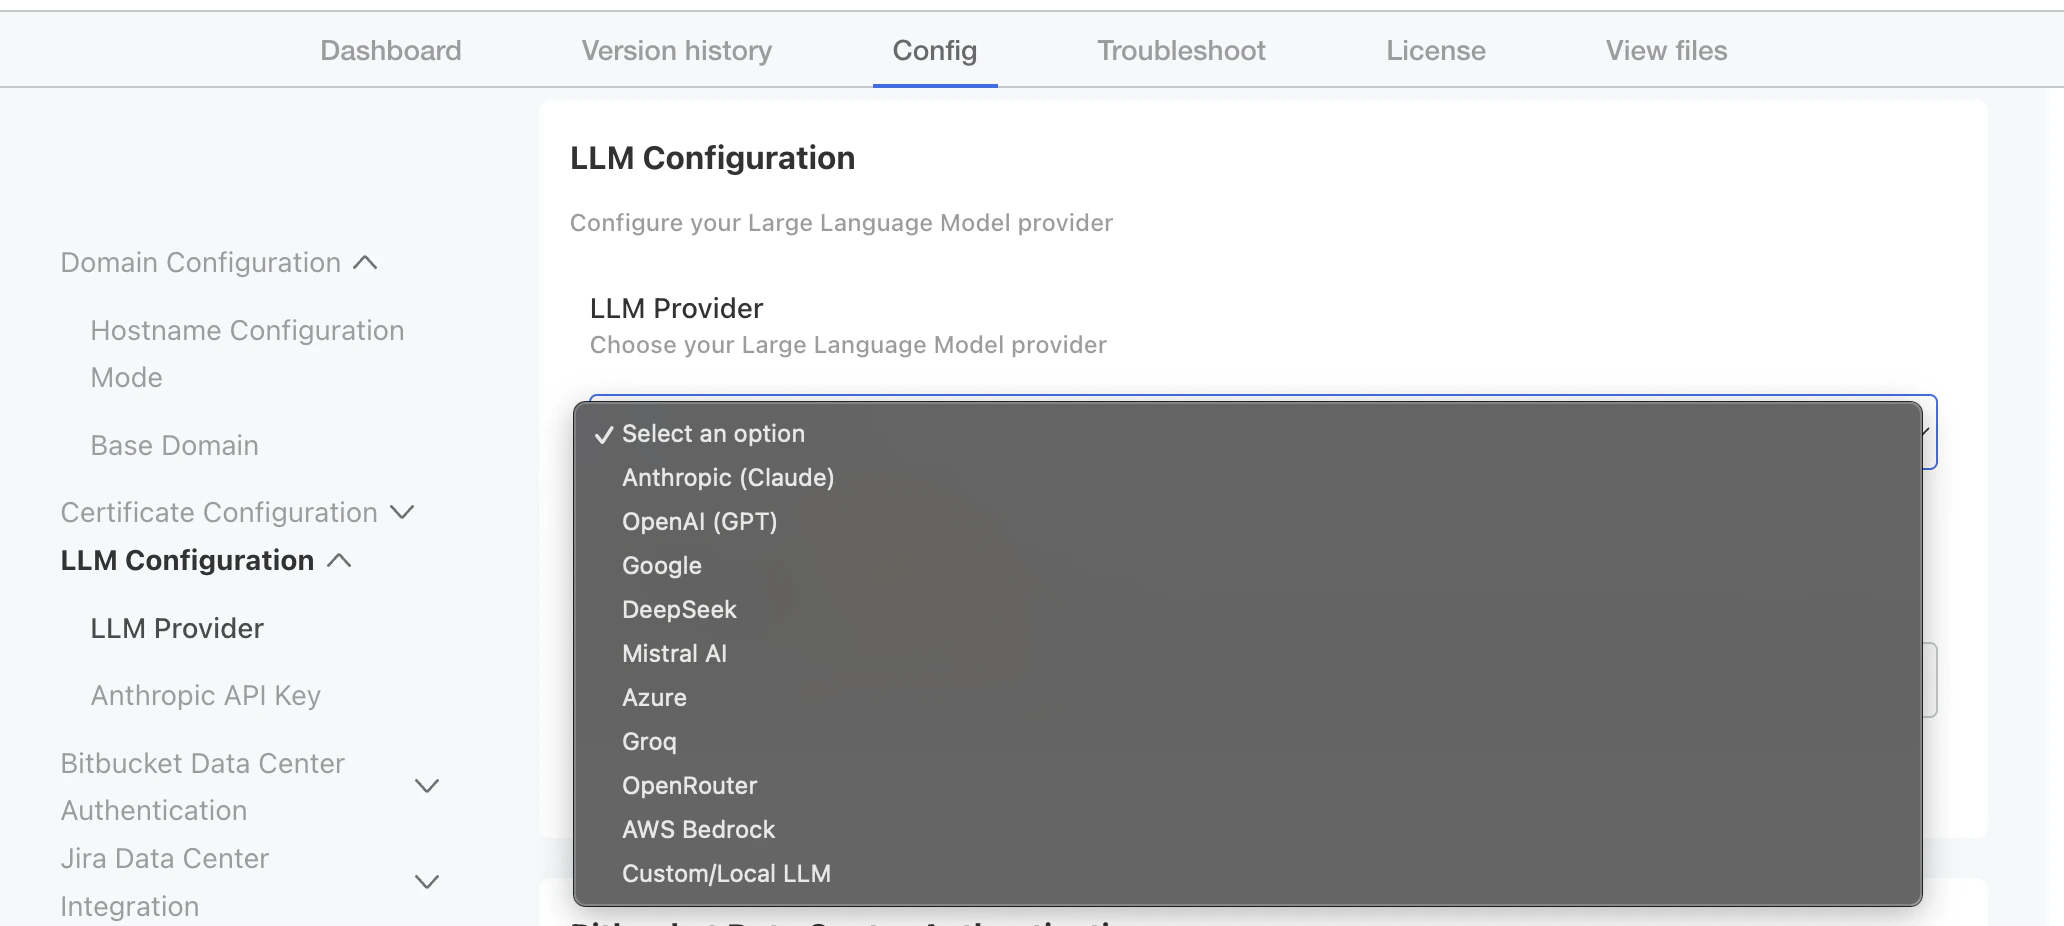 For example, if you use Anthropic, enter your API key from the
[Anthropic Console](https://console.anthropic.com/).
### Database Configuration
By default, OpenHands Enterprise uses a bundled PostgreSQL database. If you need to use your
own PostgreSQL instance (for example, to integrate with existing database infrastructure or
meet specific backup/HA requirements), see [External PostgreSQL](/enterprise/external-postgres)
for setup instructions.
### GitHub Authentication
Enable GitHub Authentication in the Admin Console, then follow these steps to create and
configure a GitHub App.
#### Create a GitHub App
Run our [script](https://github.com/All-Hands-AI/OpenHands-Cloud/tree/main/scripts/create_github_app) to create a GitHub App configured for your install.
#### Map GitHub App values to Admin Console
Go back to the Installer Admin Console in your browser and enter the values from the Create GitHub App script output. For the private key, upload the file from the `keys` directory of the script location.
### Additional Integrations
If your team uses Jira Data Center or Bitbucket Data Center, follow these guides
to configure Admin Console values before deployment and complete webhook setup
inside OpenHands after deployment.
Configure Bitbucket Data Center login, repository access, bot identity, and pull request webhooks.
Configure Jira issue triggers, OAuth account linking, service account credentials, and Jira webhooks.
After filling in all fields, click **Continue** at the bottom of the page.
## Deploy and Verify
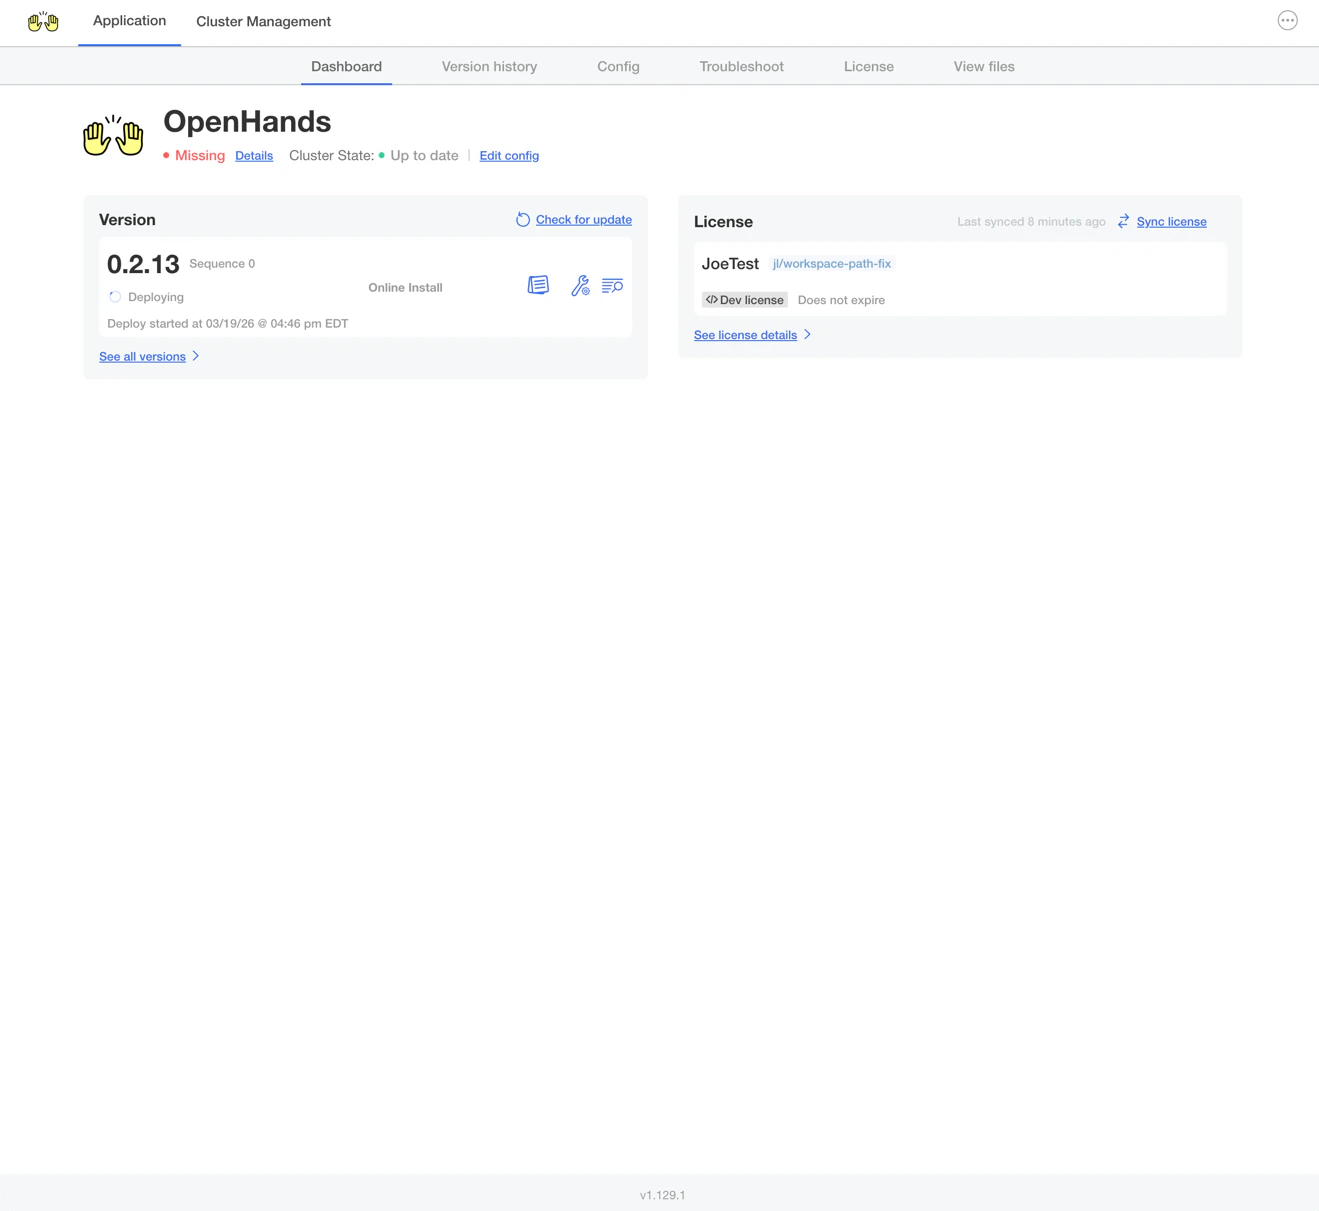
OpenHands will begin deploying. You can expect the deployment status to transition from
**Missing** to **Unavailable** to **Ready**. This typically takes 5-10 minutes.
For example, if you use Anthropic, enter your API key from the
[Anthropic Console](https://console.anthropic.com/).
### Database Configuration
By default, OpenHands Enterprise uses a bundled PostgreSQL database. If you need to use your
own PostgreSQL instance (for example, to integrate with existing database infrastructure or
meet specific backup/HA requirements), see [External PostgreSQL](/enterprise/external-postgres)
for setup instructions.
### GitHub Authentication
Enable GitHub Authentication in the Admin Console, then follow these steps to create and
configure a GitHub App.
#### Create a GitHub App
Run our [script](https://github.com/All-Hands-AI/OpenHands-Cloud/tree/main/scripts/create_github_app) to create a GitHub App configured for your install.
#### Map GitHub App values to Admin Console
Go back to the Installer Admin Console in your browser and enter the values from the Create GitHub App script output. For the private key, upload the file from the `keys` directory of the script location.
### Additional Integrations
If your team uses Jira Data Center or Bitbucket Data Center, follow these guides
to configure Admin Console values before deployment and complete webhook setup
inside OpenHands after deployment.
Configure Bitbucket Data Center login, repository access, bot identity, and pull request webhooks.
Configure Jira issue triggers, OAuth account linking, service account credentials, and Jira webhooks.
After filling in all fields, click **Continue** at the bottom of the page.
## Deploy and Verify
OpenHands will begin deploying. You can expect the deployment status to transition from
**Missing** to **Unavailable** to **Ready**. This typically takes 5-10 minutes.
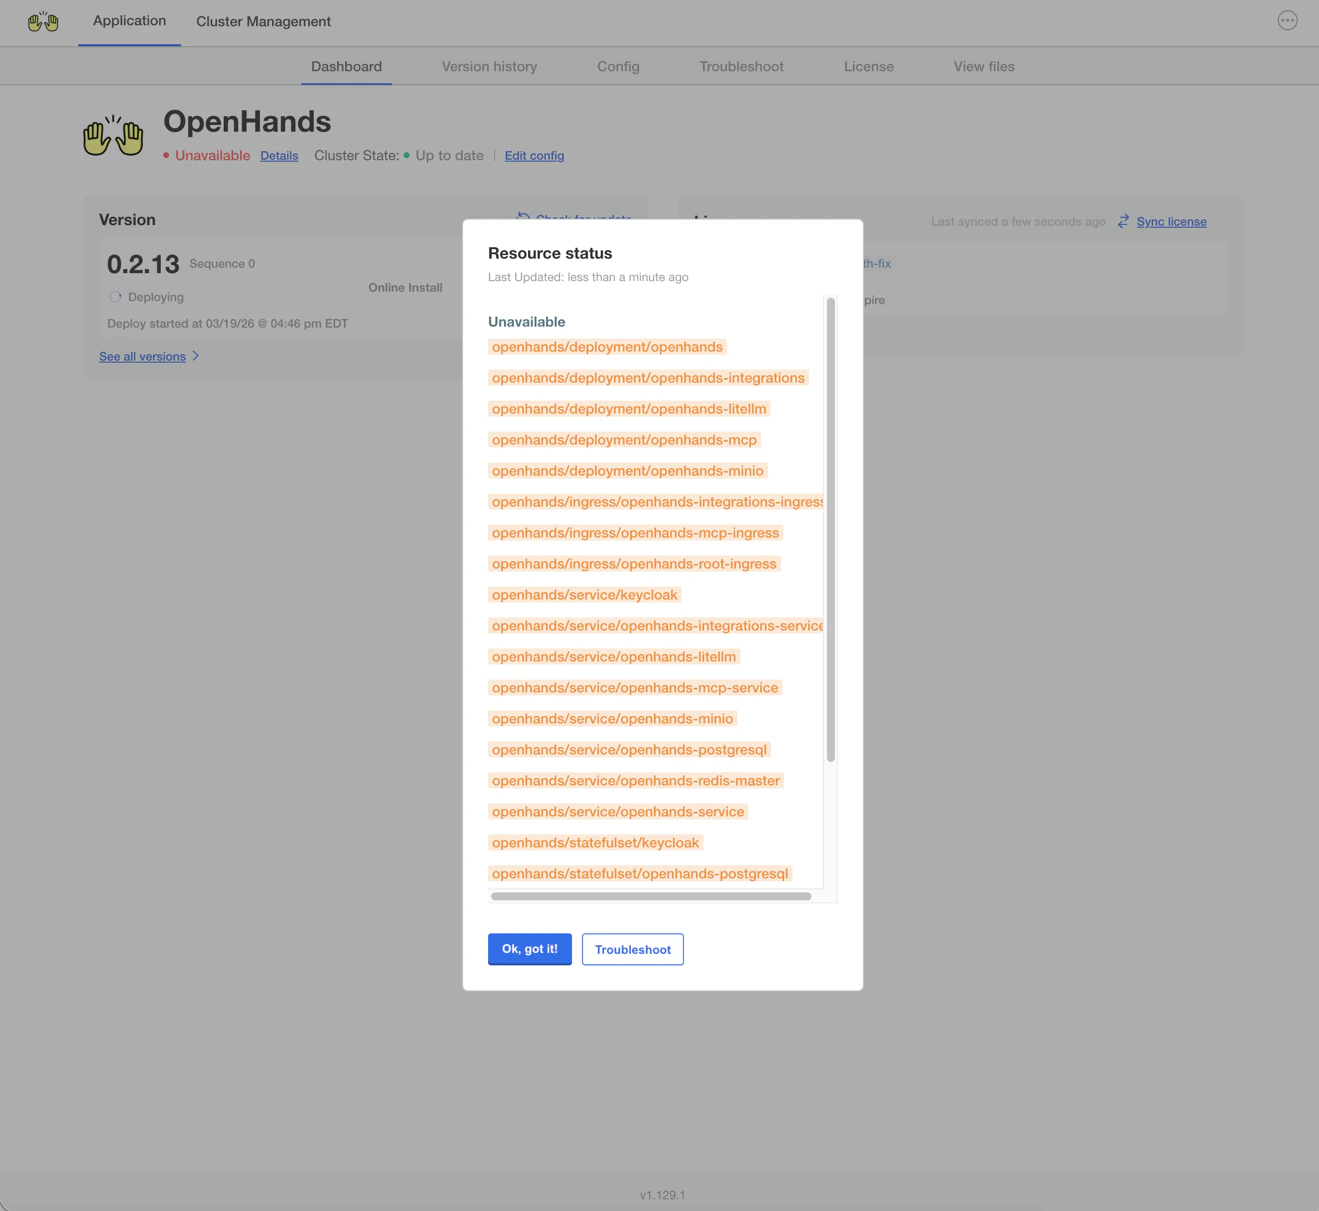
 Click **Details** next to the deployment status to monitor individual resources. Resources
shown in orange are still deploying -- wait until all resources are ready.
Click **Details** next to the deployment status to monitor individual resources. Resources
shown in orange are still deploying -- wait until all resources are ready.
 ## First Login
Once the deployment status shows **Ready**, navigate to `https://app.`
and click the **Login with GitHub** tile.
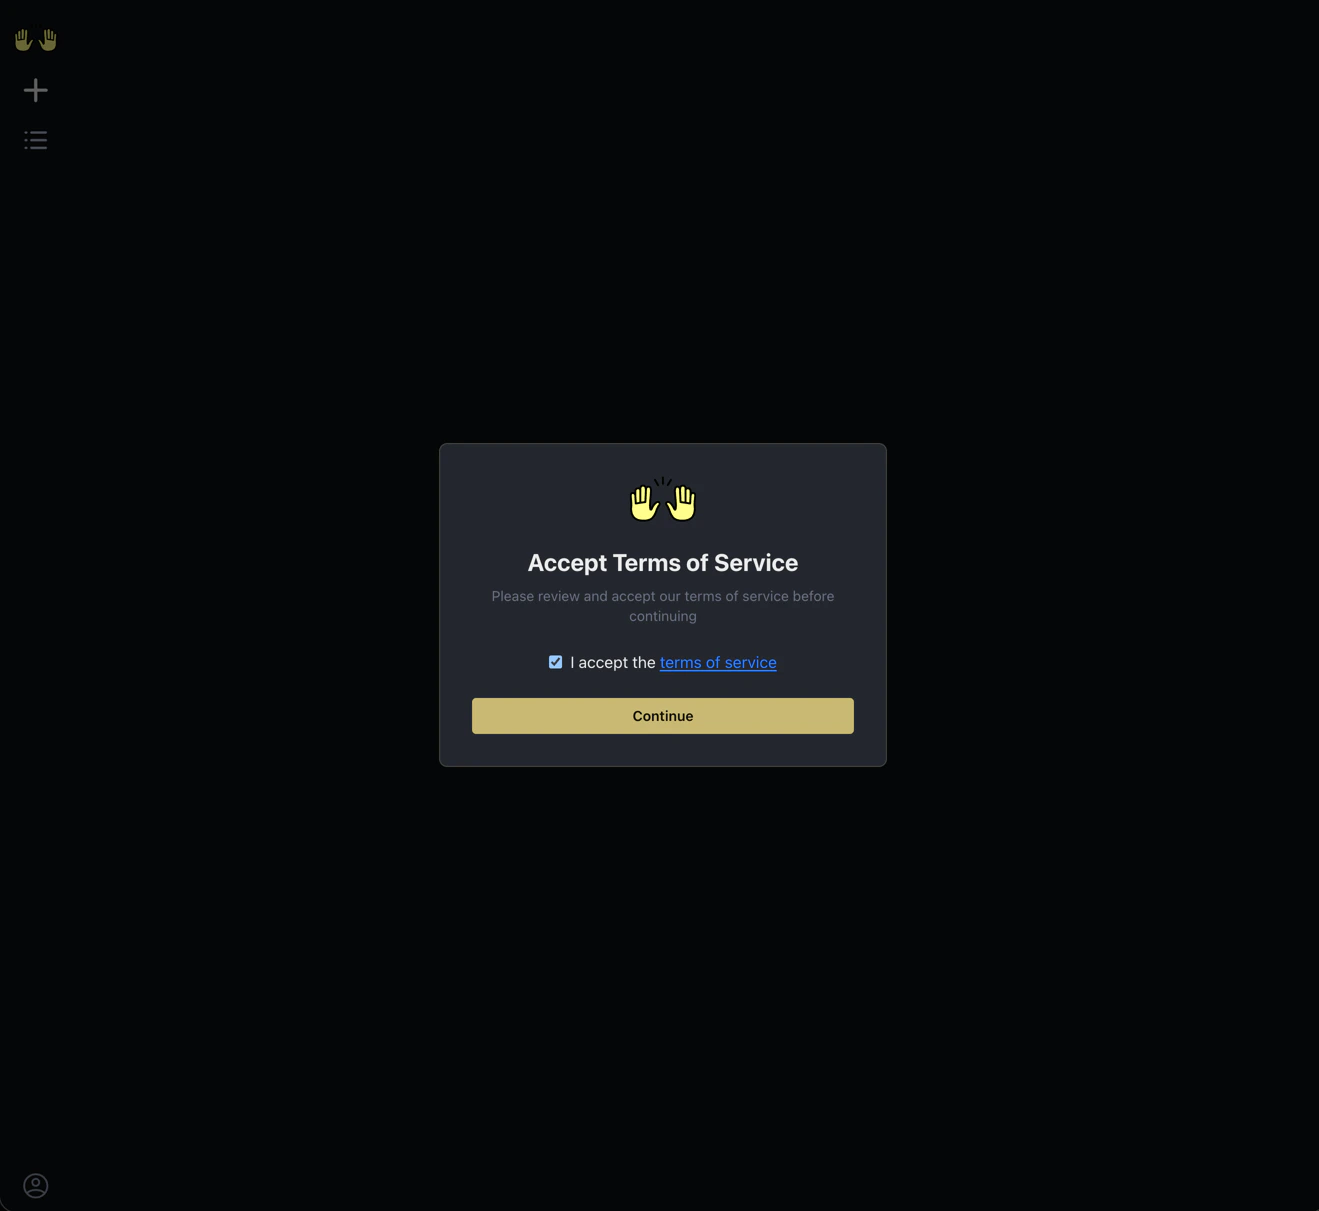
Accept the Terms of Service and click **Continue**.
## First Login
Once the deployment status shows **Ready**, navigate to `https://app.`
and click the **Login with GitHub** tile.
Accept the Terms of Service and click **Continue**.
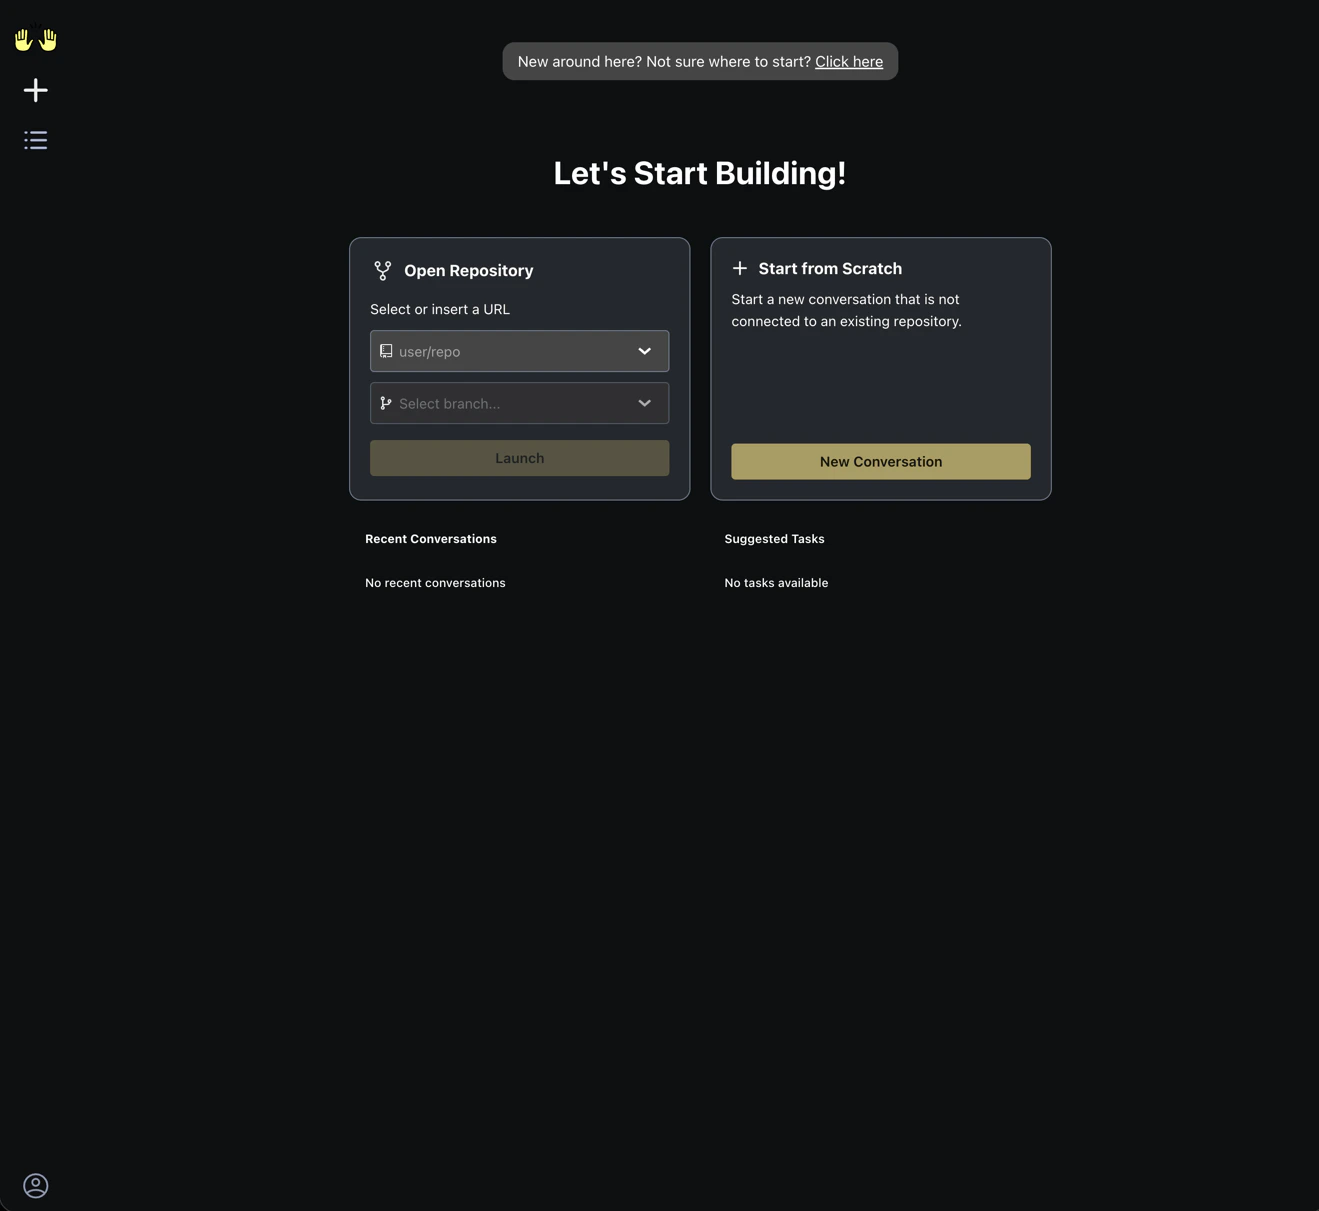
 OpenHands Enterprise is now running. You can open a repository or start a new conversation.
 ## Next Steps
Learn about OpenHands Enterprise features, integrations, and deployment options.
Get the most out of your AI coding agents with effective prompting techniques.
Reach out to the OpenHands team for deployment assistance or questions.
Explore the full OpenHands documentation for usage guides and features.
## Next Steps
Learn about OpenHands Enterprise features, integrations, and deployment options.
Get the most out of your AI coding agents with effective prompting techniques.
Reach out to the OpenHands team for deployment assistance or questions.
Explore the full OpenHands documentation for usage guides and features.